
Commodore Amiga Workbench: A Revolutionary Operating Environment
The Commodore Amiga computer series, introduced in the mid-1980s, was a groundbreaking line of machines that pushed the boundaries of what was possible in personal computing. One of the key elements that set the Amiga apart from its competitors was its innovative operating environment known as Workbench.
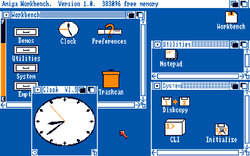
Workbench, the graphical user interface (GUI) of the Amiga, provided users with a visually appealing and intuitive way to interact with their computers. It was designed to be user-friendly, allowing even those new to computing to navigate and utilize the system with ease.
One of the standout features of Workbench was its multitasking capabilities. Unlike many other computers of its time, the Amiga could run multiple applications simultaneously without sacrificing performance. This made it an ideal platform for creative professionals who needed to work on complex projects that required running multiple software tools simultaneously.
Workbench also introduced a unique concept called “datatypes.” Datatypes allowed users to view different types of files directly within Workbench without needing specific applications for each file format. For example, you could view images, play audio files, or read documents right from within Workbench itself. This streamlined workflow and eliminated the need to open separate applications for every file type.
Customization was another strength of Workbench. Users could personalize their desktops by changing background patterns, icons, and colors to suit their preferences. This level of customization gave users a sense of ownership over their computing experience and allowed them to create a workspace that reflected their personality.
Additionally, Workbench provided easy access to various system tools and utilities through its “Tools” menu. Users could perform tasks such as formatting disks, managing files, configuring preferences, and more—all without needing to dive into complex command-line interfaces.
Over time, Commodore continued evolving Workbench with updates and new versions that added additional features and improved functionality. Each iteration brought enhancements to the GUI, performance optimizations, and expanded compatibility with new hardware and software.
The legacy of Commodore Amiga Workbench lives on today. Its influence can be seen in modern operating systems that have adopted similar concepts, such as multitasking, intuitive GUIs, and customization options. Workbench played a significant role in shaping the user experience we now expect from our computers.
Commodore Amiga Workbench was truly ahead of its time. Its innovative features, multitasking capabilities, customization options, and user-friendly interface set a new standard for personal computing. Even though the Amiga line may no longer be in production, its impact on the industry and the fond memories it evokes for many enthusiasts ensure that Workbench will always hold a special place in computer history.
Frequently Asked Questions About Commodore Amiga Workbench: Latest Version, Installation, Features, Usage, and Resources
- What is the latest version of Commodore Amiga Workbench?
- How can I install Commodore Amiga Workbench on my computer?
- What are the features of Commodore Amiga Workbench?
- How do I use Commodore Amiga Workbench to create programs and games?
- Where can I find tutorials and resources for programming with Commodore Amiga Workbench?
What is the latest version of Commodore Amiga Workbench?
The latest official version of Commodore Amiga Workbench released by Commodore International was Workbench 3.1, which came out in 1993. Workbench 3.1 introduced several improvements and new features, including enhanced support for larger hard drives, improved memory management, updated system utilities, and bug fixes.
However, it’s worth noting that there have been subsequent unofficial updates and community-driven projects that have extended the capabilities of Amiga systems beyond the official releases. These projects aim to provide additional features, bug fixes, and compatibility enhancements to keep the Amiga platform alive and relevant in modern times.
Some notable examples include “Classic Workbench” and “AmiKit,” which are community-developed distributions based on older versions of Workbench but with added enhancements and modern conveniences.
While these community-driven projects continue to evolve, it’s important to remember that the official last release from Commodore was Workbench 3.1.
How can I install Commodore Amiga Workbench on my computer?
Installing Commodore Amiga Workbench on a modern computer involves using an emulator that replicates the Amiga hardware and software environment. Here are the general steps to get started:
- Choose an Amiga Emulator: There are several popular Amiga emulators available, such as WinUAE, FS-UAE, or E-UAE. Research and select the emulator that best suits your operating system (Windows, macOS, or Linux).
- Obtain a Workbench Disk Image: Locate a disk image of the Workbench operating system. These can often be found on websites dedicated to preserving Amiga software or through legal means such as purchasing from official sources.
- Configure the Emulator: Install and launch your chosen emulator. You will need to configure it by specifying various settings like memory allocation, CPU type, display options, and input devices. Refer to the emulator’s documentation for guidance on how to set it up correctly.
- Mount the Workbench Disk Image: Within the emulator’s configuration settings, locate the option to mount disk images. Select your downloaded Workbench disk image file (.adf or .dms format) and assign it to one of the virtual floppy drives in the emulator.
- Start Emulation: Save your emulator settings and start emulation. The emulator will boot up with a simulated Amiga environment.
- Install Workbench: Once you see the simulated Amiga screen, follow the on-screen instructions to install Workbench from the mounted disk image onto a virtual hard drive or partition within the emulator.
- Customize and Explore: After installation, you can explore Workbench by interacting with its graphical user interface just as you would on a physical Amiga computer. Customize your desktop appearance, launch applications, manage files, and enjoy all that Workbench has to offer.
It’s important to note that installing Commodore Amiga Workbench on modern computers through emulation is for personal use only if you own the original Amiga software. Emulators and disk images should not be used for piracy or copyright infringement.
By following these steps, you can experience the nostalgia and functionality of Commodore Amiga Workbench on your computer and explore the rich history of this iconic operating environment.
What are the features of Commodore Amiga Workbench?
Commodore Amiga Workbench, the graphical user interface (GUI) of the Amiga computer series, offered a range of innovative features that set it apart from other operating environments of its time. Here are some notable features of Commodore Amiga Workbench:
- Multitasking: Workbench allowed users to run multiple applications simultaneously without sacrificing performance. This multitasking capability was a significant advantage over many other computers at the time.
- Datatypes: Workbench introduced the concept of “datatypes,” which allowed users to view various file types directly within the GUI itself. Users could open and view images, play audio files, read documents, and more without needing specific applications for each file format.
- Customization: Workbench provided extensive customization options for personalizing the desktop environment. Users could change background patterns, icons, colors, and fonts to suit their preferences and create a unique workspace.
- Tools Menu: Workbench included a convenient “Tools” menu that provided easy access to various system utilities and tools. Users could perform tasks such as formatting disks, managing files, configuring preferences, and more directly from within the GUI.
- Intuitive Interface: The user-friendly interface of Workbench made it accessible even to those new to computing. It featured icons, menus, and windows that were easy to navigate and interact with.
- File Management: Workbench offered efficient file management capabilities, allowing users to organize their files and folders seamlessly. Copying, moving, renaming, and deleting files was straightforward through drag-and-drop functionality.
- Compatibility: Workbench was designed to be compatible with a wide range of hardware and software available for the Amiga platform. This ensured that users had access to a diverse selection of applications and peripherals.
- Updates and Enhancements: Commodore regularly released updates and new versions of Workbench that added new features, improved performance, expanded compatibility with hardware/software advancements, and addressed any issues or bugs.
These features made Commodore Amiga Workbench a revolutionary operating environment during its time. Its multitasking capabilities, datatypes, customization options, user-friendly interface, and efficient file management contributed to the overall appeal and functionality of the Amiga computer series.
How do I use Commodore Amiga Workbench to create programs and games?
Using Commodore Amiga Workbench to create programs and games is a rewarding and creative endeavor. Here are some steps to get you started:
- Familiarize yourself with the Amiga Workbench environment: Spend some time exploring the various features of Workbench, such as the file manager, preferences, and system tools. This will help you understand how the operating system functions and how to navigate through its interface.
- Learn a programming language: To create programs and games on the Amiga, you’ll need to learn a programming language compatible with its architecture. Popular choices include assembly language (such as 68000 assembly) or high-level languages like C or Pascal. There are resources available online, including tutorials and documentation, to help you get started with programming on the Amiga.
- Obtain a development environment: To write code for the Amiga, you’ll need a development environment that supports Amiga-specific programming. One widely used development environment is SAS/C (SAS/C Development System), which provides an integrated development environment (IDE) for C programming on the Amiga.
- Utilize Amiga-specific libraries and APIs: The Amiga has its own set of libraries and APIs (Application Programming Interfaces) that provide access to various hardware features and functionality of the system. These libraries include Intuition (for GUI), Graphics (for graphics manipulation), Sound (for audio), among others. Familiarize yourself with these libraries as they will be essential for creating programs and games.
- Experiment with game development tools: If your goal is specifically game development, consider exploring game development tools available for the Amiga platform. Software like AMOS (AMOS Basic) or Blitz BASIC provide easy-to-use environments that simplify game creation by providing pre-built functions and resources tailored for game development.
- Join the community: Engage with other Amiga enthusiasts, programmers, and game developers through online forums, social media groups, and dedicated Amiga communities. These communities can provide valuable support, guidance, and feedback as you embark on your programming journey.
- Test and refine your creations: As you develop programs or games, regularly test them on your Amiga hardware or through an emulator to ensure they function as intended. Debugging and refining your code will help improve the performance and stability of your creations.
Remember, creating programs and games for the Amiga requires patience, persistence, and a willingness to learn. Enjoy the process of exploring the capabilities of the Amiga Workbench environment and let your creativity shine through in your programming endeavors.
Where can I find tutorials and resources for programming with Commodore Amiga Workbench?
If you’re interested in programming with Commodore Amiga Workbench, there are several resources available to help you get started and enhance your skills. Here are some places where you can find tutorials and other valuable information:
- Amiga Developer Docs: The official documentation provided by Commodore is a great starting point. It covers various aspects of programming for the Amiga, including Workbench, and provides detailed explanations, examples, and reference materials. You can find these documents online at sites like amigadev.elowar.com.
- Online Forums and Communities: Joining online forums and communities dedicated to the Amiga platform can be extremely helpful. Websites like English Amiga Board (eab.abime.net) and Amiga.org have active communities of enthusiasts who are always willing to share their knowledge and provide guidance on programming with Workbench.
- YouTube Tutorials: Video tutorials on platforms like YouTube can be a valuable resource for visual learners. Search for channels or specific videos that focus on programming with Commodore Amiga Workbench. Some creators may cover topics such as using the Amiga Developer Docs, coding techniques, or creating applications within the Workbench environment.
- Books and Publications: Look for books or publications that specifically cover programming for the Commodore Amiga platform. While some of these resources may be out of print, you may still find them in libraries or second-hand bookstores. Websites like Amazon or eBay might also have used copies available.
- Online Code Repositories: Explore code repositories like GitHub that host open-source projects related to the Amiga platform. You might find sample code, libraries, or even complete applications that can serve as learning resources for programming with Workbench.
- Retro Computing Communities: Engaging with retro computing communities can connect you with fellow enthusiasts who have experience programming on the Commodore Amiga platform. Platforms like Reddit (r/amiga) or Discord servers dedicated to retro computing can be great places to ask questions, share ideas, and find resources related to Amiga programming.
Remember, programming for Commodore Amiga Workbench may require knowledge of specific programming languages like AmigaBASIC, ARexx, or C. It’s essential to have a good understanding of these languages to make the most of the available resources and tutorials.
By leveraging these resources and engaging with the community, you’ll be well on your way to exploring the vast possibilities of programming with Commodore Amiga Workbench. Good luck on your coding journey!